Minimal API Gateway with Spring Boot

How to build a minimal API Gateway with Spring Boot for your microservice infrastructure.

Introduction

There are many API Gateway tools available, each with advantages and disadvantages. But sometimes, we need something simpler because of very specific business rules, for example. This is why you might want to create your own API Gateway.

To create this minimal API Gateway, we will use a Spring Cloud Gateway utility object calledProxyExchange. From the official documentation:

You can use it inside a regular Spring web handler as a method parameter. It supports basic downstream HTTP exchanges through methods that mirror the HTTP verbs. With MVC, it also supports forwarding to a local handler through the forward() method. To use the ProxyExchange, include the right module in your classpath (either spring-cloud-gateway-mvc or spring-cloud-gateway-webflux).

Creating the API Gateway

So, let's create a new Spring Boot application with the Spring Reactive Web dependency and add the dependency below to the project'spom.xml or build.gradle file.

<dependency>
  <groupId>org.springframework.cloud</groupId>
  <artifactId>spring-cloud-gateway-webflux</artifactId>
  <version>4.1.5</version>
</dependency>

The next step is to add a controller that matches any request. See the example below written in Kotlin:

@RestController
class GatewayController {
    @RequestMapping("/**")
    fun proxy(
    ): Mono<ResponseEntity<ByteArray>> = Mono.empty()
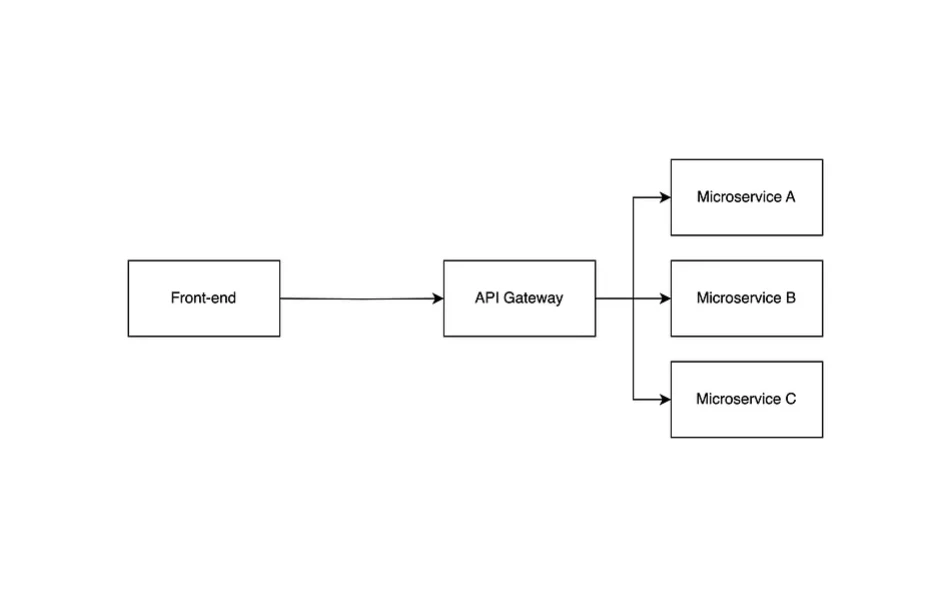
}

What's the basic job of an API Gateway when working with microservices? Basically, it is to be a unique entry point for all the microservices we want to expose to the external world. To cite a few examples, the external world can be a front-end web application or a mobile application. This way, the consumers don't need to know the addresses of all the microservices. So, the basic job is to act like a reverse proxy.

API Gateway illustration

The next step is to implement the routing logic. Here, your business rules will be coded. You could route the requests to each microservice based on the domain, subdomain, first part of the path, or a combination of many. To keep things simple, the example will redirect any request to the website https://httpbin.org. Check the example:

@RestController
class GatewayController {
    @RequestMapping("/**")
    fun proxy(
        httpRequest: ServerHttpRequest,
        httpProxyExchange: ProxyExchange<ByteArray>,
    ): Mono<ResponseEntity<ByteArray>> =
      httpProxyExchange
          .uri("https://httpbin.org/${httpRequest.method.name().lowercase()}")
          .forward()
}

In this code, we ask Spring to inject two objects into the proxy function. The first one is the ServerHttpRequest because we want to read the HTTP method name. The second one is the ProxyExchange which forwards the request to the service.

The coded routing logic reads the HTTP method and appends it as a path parameter in the URL. Then, we call the forward() method to forward the request.

Authorizing the requests

Another important API Gateway job is allowing only authorized users to access the APIs. Because this is a normal Spring Boot application, you can use the Spring Oauth2 Resource Server library, for example, to validate a JWT using a JWKS.

If you have different requirements, you can write a Spring Web Filter to do something with the request or the response. But remember: never block the threads. Otherwise, the performance of your reactive application will degrade.

Conclusion

Building a minimal API Gateway with Spring Boot offers a simplified and customizable solution for managing microservice interactions. By taking advantage of the Spring Cloud Gateway and its ProxyExchange utility, you can efficiently route requests and enforce business rules without the complexity of more extensive API Gateway tools.

This approach simplifies the infrastructure and ensures your microservices remain accessible and secure. Whether you need to implement specific routing logic or enforce authorization, Spring Boot provides the flexibility to meet your unique requirements while maintaining high performance.

This article was written by João Paulo Gomes for the WAES Medium blog.

Thanks for reading.
Now let's get to know each other.

What we do

WAES supports organizations with various solutions at every stage of their digital transformation.

Discover solutions

Work at WAES

Are you ready to start your relocation to the Netherlands? Have a look at our jobs.

Discover jobs

Let's shape our future

Work at WAES

Start a new chapter. Join our team of Modern Day Spartans.

Discover jobs

Work with WAES

Camilo Parra Gonzalez

Camilo Parra Gonzalez

Account Manager